Monday, December 31, 2018

Small Changes To The Bench and A Old Appliance

I've had little time in the shop after the return from Houston. MsBubba wanted a new electrical outlet in the kitchen and the modem died. Both were near full days to fix.

Have I ever told you how much I hate pulling wire. The good news, it was a one trip to the hardware store job. The bad, it still took almost a full day to complete.

Today was tech support hell, after hours of "live chat" they finally decided my modem was bad and sent me to the company store to pick up a new one. After installing the new modem at first it wouldn't let me rename the wireless networks which of course needed another couple of hours of 'live chat" to resolve.

Like I said shop time has been limited but I did get a couple of things done. First was cleaning up the mess I left getting out the door to Houston and unloading the tools and portable workbench from the truck.

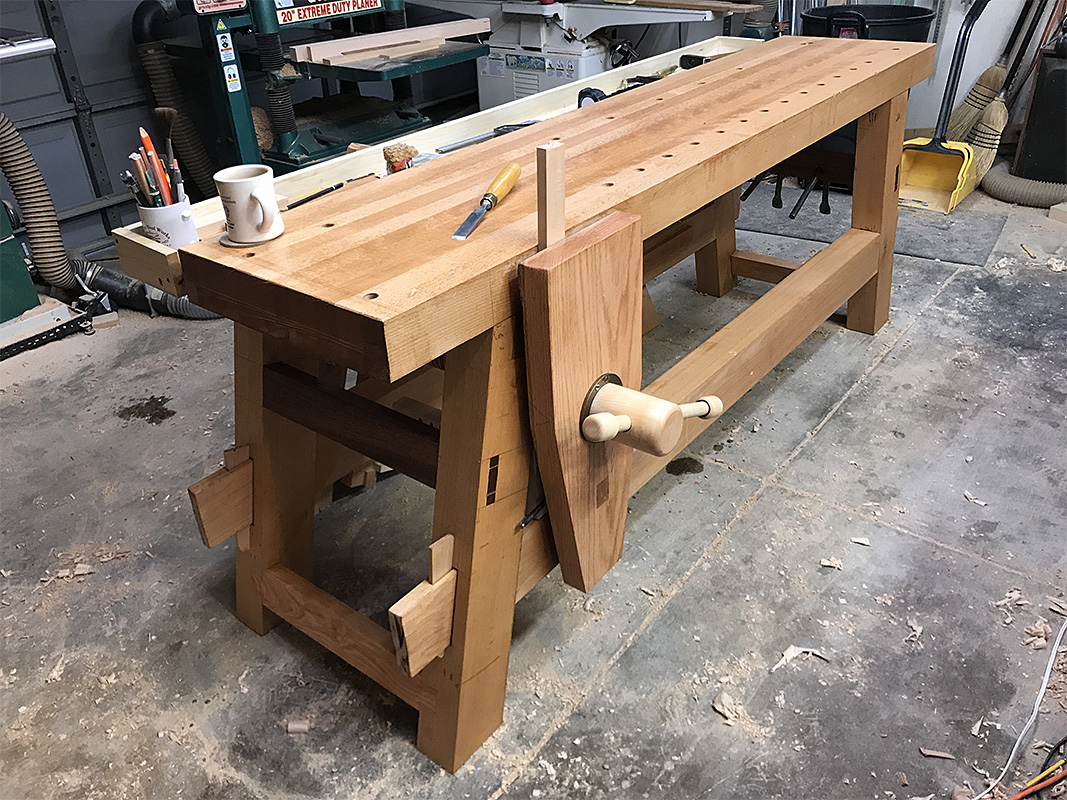
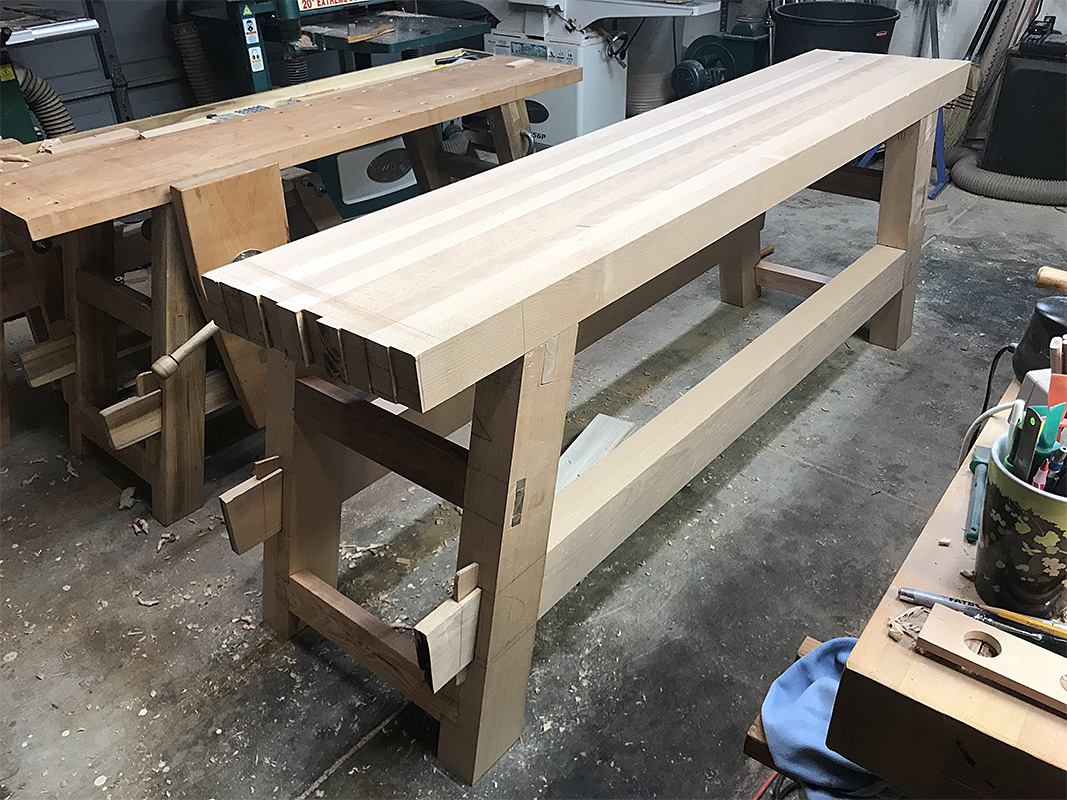
I've wanted to add a lower shelf to the Moravian bench and my first thought was to buy some Home Depot Pine for the slats. Bad ideal Bubba, I couldn't believe the price of bad boards. After digging through the wood pile I found a 4/4 Red Oak board that was just long enough to do the job. The Red Oak looks better than the Pine would have anyway.

Here is a photo, I expect I will bevel the edges and maybe put a "stop" on the end boards along with maybe some Danish Oil finish.


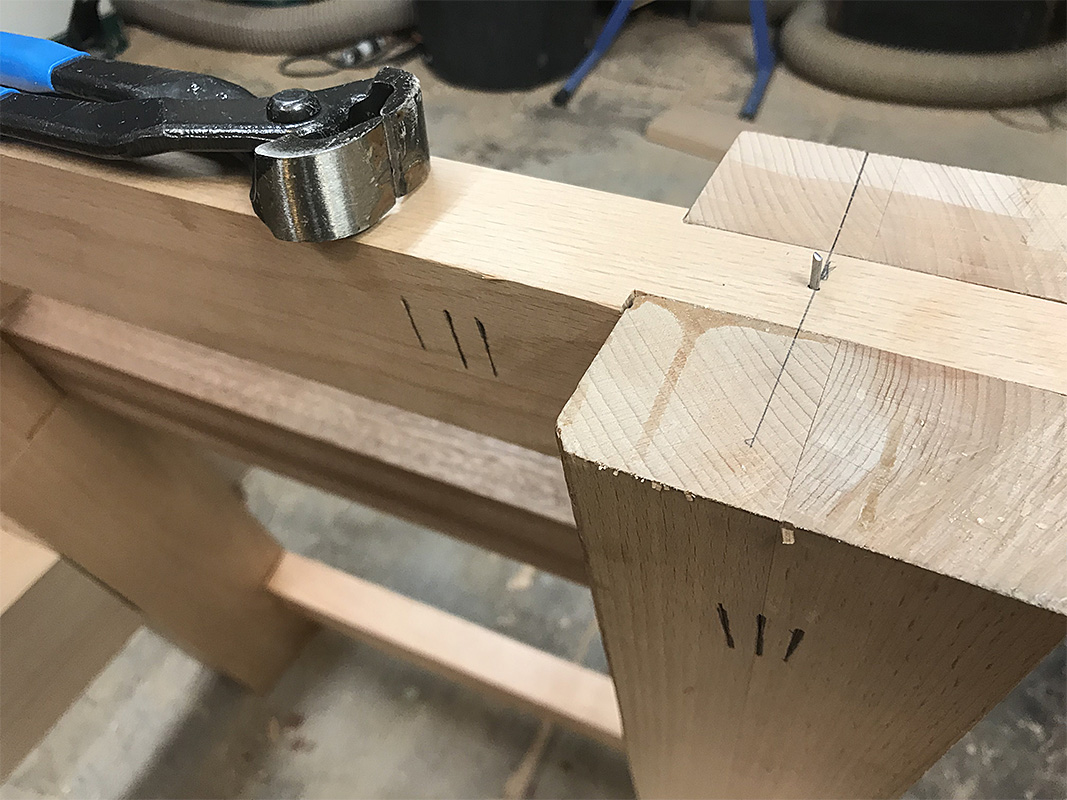
While digging around under the other bench I found a bench appliance I had started but never finished. It was all there but I had not glued the 3/4" dowel to the appliance. It is a simple but very useful bench helper.

A photo of the appliance in use.


My guess is I made it as long as I did to use in the end dog holes so the vise would not be in the way. Whatever it is a great way to hold work for edge planning.

ken


Sunday, December 30, 2018

Thoughts While Driving

Tucson, AZ to Friendswood (Houston), TX is just under 1100 sm. From our house in Tucson it is only a few miles to I-10. Almost all the trip is on I-10 with only the last few miles on I-45, and State 528 (NASA Road 1). Because of I-10 the trip is quick, only about 16 hours of driving for an average speed of just under 68mph. My old Iron Butt motorcycle riding days habits kick in: Ride, fuel and pee, ride, repeat until you get there.

We did the going trip non stop, coming home we stopped in Ft. Stockton, TX mostly because I hate to ride or drive between Ft.Stockton and Van Horn after dark. It is one of the most deer infested roads in the States. Seldom can you go more than five miles without seeing a deer carcass on or beside the road over that route.

Bottom line there is plenty of time to think as you cover miles and miles of mostly high desert interrupted by only two major cities, El Paso, TX and San Antonio, TX. Also because I've done the trip so many times it has a rhythm to the fuel and pee stops, no surprises, no thought needed.

While MsBubba and I talked some about family and I talked about growing up and exploring the area we were driving through most of my thoughts were about where we are as a country, how dumb our country's current policies are towards Mexico and immigration along our Southern border. Also having to deal with the CBP checkpoints outside Sierra Blanco, TX and Deming, NM brings home how much our country has changed, how we have allowed policies such as "papers please" and drug checkpoints along with drug testing to be implemented.

I haven't the time or energy to go deeper than one example of how dumb our current President and his enablers are. While we were driving Trump talked of closing the Southern Border if he doesn't get his stupid wall funded. The economic costs of his government shutdown may hurry the coming recession, the cost of closing the border is almost incalculable. US border towns, both big and small, like El Paso or Del Rio rely on Mexican nationals crossing daily to shop for goods and food. It couldn't get dumber.

On a personal note; I was raised and my Grandmother was cared for in her later years by a "wetback"*. Carlos was always there except when he wasn't. When he was caught and sent back to Mexico there always seemed to be a cousin or brother that would show up to help out until three or four months later Carlos would be back. It was rinse and repeat until I grew up and left the farm and my Grandmother died. What happened to Carlos I'm ashamed to admit I don't know because I had been gone from the farm for many years before my Grandmother died and had lost touch.

We didn't have a sane policy toward immigration then, it is even less so today.

ken

*I know an offensive term but it is the one used during that time for undocumented workers. While our language has improved our treatment of good folks that improve our lives hasn't.


Saturday, December 29, 2018

Home in Tucson

It was a good trip, a boring report later and catching up on everyone's posts also to follow.

Most important I made it home with 100 Luling City Market links and a gal of sauce. Over 2000 miles of driving for sausage links and worth every mile, that and the BBQ, oysters, shrimp, Mexican food, and Vietnamese sandwiches. May be a good thing I no longer live in Houston I'd likely be over 300 lbs if I did.

ken

Tuesday, December 25, 2018

Still in Houston

Sixteen hours doorstep to doorstep, not too bad for an OF. BTW, like with Bob, Blogger and iPads do not play well together and for the most part the iPad is all I have.  While I can read the posts, there will be no comments until we are back in Tucson.

Having the portable workbench with me has been great. The fix of the changing table was finished the first day here and I was able to finish the three legged stools in time for the Solstice Celebration.

So far on my march through Texas I've had a couple dozen oysters on the half shell, five pounds of boiled shrimp (I'm still working on finishing), kolaches, and I still working on Luling City Market BBQ, Thai, Vietnamese, and the crown jewel El Tiempo Cantina.  Folks who never enjoyed the early years of Mama Ninfa's can't relate but her sons have gotten damn close to Mama and maybe even bettered her in some areas.

MsBubba may stay longer, if she does I'll head back to Tucson in a couple, if not we will leave on the 31st.

ken

Friday, December 21, 2018

On The Road Again

Making music with my best friends or some such. The critters, MsBubba and I will resurface in Houston in somewhere around 18 to 20 hours.

See you guys and gals on down the road,

ken

Wednesday, December 19, 2018

Tenon Cutter

Matt asked about the tenon cutter. This one is from Lee Valley and cuts a 12* tenon matching LV's 12* reamer.

After drilling a 5/8" hole in the seat I ream it to size using the LV reamer and a blank test leg (not shown). Then it is turning and fitting the leg tenon to the seat mortise. I start with making a rough tenon on the lathe. A chisel or drawknife would work as well but I expect the lathe is faster.


Roughing the tenon:


Once the tenon is close I do the final fitting with the LV tenon cutter:


It is kinda like using a big pencil sharpener.

I suspect if I had decent turning skills the tenon would/could fit directly off the lathe. I don't so the tenon cutter is a feel good tool.

I will not have time to finish the stools before leaving for Houston but the parts are ready for final clean up and assembly. I'll have a bench and a working set of tools with me to finish the job and/or split another couple of seats.

Houston, kids (I guess I shouldn't call them kids they have been productive adults for a long time now), grandpeanuts, good Mexican food, BBQ, and Vietnamese to follow along with driving TBMRITS (I-10 The Best Motorcycle Road In The States) about 18 hours each way. When I did my 50 CC Ironbutt ride from San Diego to Jacksonville it only took a little over 40 hours and that included rest stops. It is a long way to Houston and most of it is in Texas. Life doesn't get much better.

ken

Saturday, December 15, 2018

Well (**&&^*(*())_)

Good, I didn't kick the dog or do anything else dumb. Bottom line some days the magic works, some days it doesn't.

Both seats split when I set the legs. When setting the legs you should tap 'em in just until they sound "right". If you add a tap a split is likely. The first seat split in two places. I did not think I had done the extra tap but the results tell the truth. I was able to save the legs, they will live to be used on another day.

I was extra careful with the second stool, so careful when I turned it over the back leg fell out. Back to the tap-tap-tap drill. When I turned it over everything looked ok so I started wedging the legs. The wedges drove in true and everything looked good up to the last wedge just as I finished the seat split.

I'll probably keep the second stool, butterfly the crack and use it in my shop.

There isn't enough time to start over so I'll have to figure out something else to give this year.

ken

More Three Legged Stool

I didn't do any tick tock photos of the the first stool drill and fit of the mortise and tenons.  Did a little today on the second stool.

After shaping the legs I marked out the position of the mortises and the sightlines on the bottom of the seat. Once marked I drill the mortises. The first step is aligning the sight line with references. I like three, the location of the mortise center, a mid reference, and then a far reference.


Next I aline the center of the brace with the other two references.


Then check the resultant and start drilling. I will stop and check the sightline and the resultant every two to four turns.


Last a photo of the legs dry fit to the seat.


The tenons on the legs are very easy if you have a lathe, get 'em close on the lathe and then use a hand held tenon cutter for final fitting.

Next up is shaping and cleaning up the seat, sawing slots for wedges in the tenons, and then a little hide glue and knocking those suckers home. Once the glue dries trim the legs so the seat is level and put some finish on. More than likely Danish Oil because it cures quickly and I do not have a lot of time.

ken


Thursday, December 13, 2018

Three Leg Stool

MsBubba decided I needed to make a pair of stools for the boy child and the SIL's Solstice gift. Of course that was announced the day before yesterday and we leave for Houston Friday week*. It's doable if I make staked stools and the legs do not take too long to form. I like octagon legs on staked furniture but being old, slow, and not liking to be over a plane more than an hour or so before taking a long break. Making the needed six legs could take a couple or three days to form because I'm working right up to the time we leave. I could turn 'em but boring.

Machines to the rescue. I made a jig, simular the one I use to form the legs with a plane, to hold the leg blanks so I could run 'em through the planer. A day for the glue to dry on the jig and a hour running the six blanks through the planer and I have six octagon legs that just need five or ten minutes on the lathe to turn the tenon.

The jig:


The completed legs:


An hour or so drilling the mortises. A couple or three more fitting, wedging, and cleaning up and those suckers will be finished. An ataboy from MsBubba? Not a chance it is just expected :-).

ken

*Texan for the Friday a week from the coming Friday.


Saturday, December 08, 2018

"...Never Try to Outfox the Dead..."

The full quote from The anarchist's Tool Chest by Christopher Schwarz* is: "Most importantly, never try to outfox the dead when it comes to design. It's like a zombie movie; it almost never works out for the living."

The quote was about building tool chests but it has been my guide for almost everything I've done in woodworking for almost as long as I can remember. If you can figure out how the dead did it that is likely the best way to do the job. Be it tool chests, workbenches, boxes, chairs, whatever you are trying to design or build.

What brought this to mind were some of the comments, not on this blog but a forum where I posted a thread on building Moravian workbenches.

One was: "I'm a touch surprised that someone went to the trouble of building a bench with slanted legs and then mounted the leg vise dead vertical..." Then goes on to explain why a slanted leg vise was better. With no understanding of design decisions or even in reality the relative holding power of slanted vs. vertical chops. I'm not into intertubes pissing matches so I declined to answer but there were two logical questions the first being; how many workbenches have you build and/or used? The second; have you used a slanted leg vise and/or a vertical leg vise?

Another when on to explain to me why my placement and size of the long stretchers was totally wrong and that the only way to hold small pieces for planning was to pinch the work between a dog and a vise. Needless to say I left that one setting there like a turd in the punch bowl as well.

Bottom line the net allows everyone to be an expert and even better can be a great hoot. Just stay out of pissing matches and don't take it personal.

ken

*Page 365 The Anarchist's Tool Chest. Copyright 2011.

Friday, December 07, 2018

Like When I Was Young

And had a new car. I've found myself in the shop just sitting with coffee in hand looking at the new bench and occasionally running my hand over it. I know it will pass but damn she sure is pretty.

I put the bench to use yesterday getting a seat blank true. The seat blank is now true and the bench worked with no problems other than figuring out how to hold the blank. It took a minute or two to work out the needed dogs, doe foot and holdfast placement. Once that bit of butt scratching passed the bench passed its first test with no problems.

She's a keeper.

ken

Thursday, December 06, 2018

The Bench Really Is Finished

This time I mean it, the bench is finished, in place and ready to work. The small Moravian has been broken down and loaded in the truck so I can take it to Houston for our Winter Solstice celebration with the kids and have it available to repair the damage to the shipped changing table.

I'm not sure if the new bench will stay in the secondary bench position or if it will swap positions with the French/English bench.

I added ledgers to the long stretchers yesterday in case I decide on installing a lower shelf. I expect I will and it was easy to install the ledgers while the bench was apart for cleaning up the build marks.

Anyway here are some photos:


I don't know who is happier about it being finished MsBubba or me.

ken

Tuesday, December 04, 2018

If You Haven't Noticed

I'm a fanboy of the Moravian style workbench with a Lake Erie Toolworks vise screw.

Several years ago I started searching for a useable portable workbench.  With true retirement, none of this silly semi-retirement of the last twelve years where it has been short on the retirement and long on the semi. Over this period I've worked more than I ever did before but that is another story.

I knew I needed something to keep me from boredom while driving MsBubba around the country. I figured a portable workbench would be the real deal. Sounds easy, just make or buy something that is light, will fit into or break down easily to fit into the bins of the motorhome. Done deal, not so fast diesel breath.

Every design I came up with to build or buy all had a "yes but" factor. It seems with every workbench you could have some of the needed small footprint for transportation, light components, ease of assembly and disassembly, and a strong solid workbench. You could have two or three of the needed factors but never all four.

I toyed with the idea for several years and always ran into yes but until I stumbled across Will Myers' video building a Moravian style workbench. I could see at first viewing that the Moravian bench would satisfy the first three criteria with no problem and should do an ok job with the fourth. What I didn't realize was just how good a job it would do with the fourth factor of being a strong, solid workbench.

After viewing Will's video I build my first Moravian bench out of Home Depot DF and took it on our annual PNW trip. It worked a treat so much so I decided to build another this time with a Poplar base and a Beech slab and to replace my sharpening bench with the proof of concept Moravian bench.

Pretty much the same story, the second bench worked even better than the first. It was such a nice to work on bench I moved an older Roubo bench out of the secondary bench position and replaced it with the Moravian. The little bench worked so well and was such a pleasure to use I found myself doing at least 70% of my work on it instead of my massive French/English primary bench.

Nothing left to do but build a third Moravian. This time forgetting portably but building a bench with the mass and size needed for a shop bench. I completed that bench yesterday and in the little I've worked on it it does not disappoint.

After working on and building  several Moravian style benches as well as working on and building several Roubo style benches I can say with confidence the Moravian has every benefit of the French bench with non of the drawbacks. It uses less wood for the same sized bench, while lighter the finished bench is just as solid, the joinery is easier and more tolerant, and most important it can be broken down to move and/or modify as needed. The French bench once build is almost impossible to move and can be very difficult to modify.

As I said at the beginning I'm a fanboy. If you are thinking about building a bench, not just a portable bench but any bench, you should check out Will's video.

ken

Monday, December 03, 2018

The Fat Lady Has Sung, Fini

Done, time to sweep up and put tools away. I'll leave the portable up and in the way for a bit. As I clean up the build the slab may, will, need to come off a few times and the portable bench makes it easier.

Over the next few days I'll add some dog holes, clean up the slab end grain and the tool tray. A couple of stops need to be made and fitted. And somewhere in there I'll need to take it apart to clean up the stretchers and bases.

Future bench appliances will be ledgers and a lower shelf and maybe a deadman. The deadman I've used before were more in the way than helpful, I think I may have figured out how to make one work, we will see.

Some photos of the bench:


And last the Glamour shot:


What a great bench, all the advantages of a Roubo with none of the drawbacks.

ken

Sunday, December 02, 2018

Trouble With Unplugged Shop

For some reason Unplugged Shop is not refreshing. The last new post was Will Myers on 12/1. I've tried rebooting, Clearing my cache and history. Anyone else having a problem? Is it my computer or is the site just not working?

The new bench is all but finished. The vise is installed, all that is left is making a tool tray and cleaning up all the marks on the base plus I need to install the brass garder and trim the wedges on the chop as well as trim the top of the chop.

Still a bit of fiddling but it is functional. I'll leave the portable bench up for a few more days because I expect the slab will need removing several more times during the clean up

Later I may add ledgers and a bottom shelf and there is some though of a deadman, not likely but the English style apron is really handy and a dead man could almost do the same job.

During the clean up I'll trim the end grain on the slab and make bigger wedges for the tusk tenons and put some dog holes and a stop near the left end


.


I'm looking forward to putting this sucker to work.

ken

Saturday, December 01, 2018

The Fat Lady Is In The Building

No singing yet but damn close.

The vise backer is installed. All that is left is making and fitting the chop and making a tool tray.

I figure the chop is a couple or three hours (which means at least 6) and the tool tray a couple more.  After those jobs the bench will be functional, just needing a little clean up. You may see joinery markings for months, clean up is usually pretty low on my list. I'd lot rather be making things.

The vise backer with the vise hole and the parallel guide hole:


My back is telling me it is whisky time in Tucson.

ken

Fitting The Vise Backer Board

I've spend most of the day fitting the vise backer board. Next up one last M/T to chop in the slab and the vise backer. Then drilling the hole for the vise screw, and cutting the channel for the parallel guide. If things go faster than expected and my back isn't kvetching too much I may start on the chop before whisky time.


Whoops Bubba you are getting too far over your skis. I forgot about the M/T in the chop to hold the parallel guide. Whatever they are both small and quick M/Ts.

I'm not counting on it but I may finish this sucker before the weekend is over.

ken

Friday, November 30, 2018

No Work On Bench Today

Yesterday was one of those days that kick this OF's butt. I walked in the door of the office at 1400 and didn't walk out until 0200 this AM. All twelve hours were at a high stress level with the Feds looking over my shoulder. I will not go into details but let's just say because of client performance I was on a high wire without a net most of the day. My ass is still dragging. The good news is that scenario will not be repeated for at least a year.

I did have to run a rescue mission for MsBubba this morning and while out of the house I stopped by the woodstore. There I found a nice 8/4 hunk of Red Oak that is perfect for the vise chop. The vise backer is ready to work and I now have the wood for the chop. Tomorrow AM I'll start the vise install. By the end of the day my back will be whimpering no mas no mas. I'm not sure how many slab remove and replace there will be before the install is finished but it is a good number.

Time to go to the RV and watch Rachel, Friday's are almost always kick ass,

ken

Thursday, November 29, 2018

Wood Joy tools

Wood Joy sent me a 24" bow/turning saw. It is a thing of beauty. I already have a TFWW 12" bowsaw and use it all the time. It is much better than a coping or fret saw for cleaning out the waste between pins or tails. The 24"er will be used for sawing out chair/stool seat blanks.

One of the joys of woodworking is when you go down a different path there are always must have tools to buy :-).


ken

Bench Peg Mortise And Fitting Slab

Drilling the peg mortises:


Cleaning up long (back) peg mortise:


Slab installed:


I've found for the first time fitting of the slab it is best to back the tusk tenons off a bit. Get the slab settled on the pegs then reset the tusk tenons to draw everything up tight. After fitting I tested the bench both lengthwise and across to see if I can move it. This sucker is solid there ain't no way no how it will move, short of a Mack truck running over it.

Time to fit the vise. First up chop or vise backer makes no never mind. I may start with fitting the vise backer because it is ready to work on. I still have not settled on wood for the chop.

ken

Blind Peg Marking

I marked the location of the pegs for securing/fitting the slab to the base yesterday. I have not drilled the mortises for the pegs yet. Because drill bits can vary slightly in size I need to test bit to peg to make sure of the fit. That is first thing this AM.

The blind pegging first step is to decide on peg location and drive a nail in far enough to be secure but easy to remove.


Next snip off the nail so it is lower than the slats used to support the slab while positioning but high enough to make a good mark and is also high enough to be easily removed.


Then position the slab. Once satisfied with position carefully remove the support slats and press, use a lumpy or whatever means needed to press the slab down on the cut nails, marking the position of the pegs and mortises.


The mark closest to the front edge of the slab will be drilled to peg size, single arrow. The back mark, with a circle, will be drilled elongated to allow movement of the slab. The marks on the base will be drilled to peg size and will have the pegs glued with around 25mm or so exposed.

An easy but ingenious process.

ken

Wednesday, November 28, 2018

Moravian Workbench

I'm in the short rows of my full sized copy of the portable Moravian workbench based on the Will Myers video . There is more information on Will's blog Eclectic Mechanicals. After building a number of Roubo and Moravian benches and working on each style bench I'm convinced for either first time builders or even experienced bench builders the Moravian style bench is the better bench.

I've built a number of workbenches the first was very loosely based on photos of benches in early issues of Fine Woodworking. I didn't have a clue but that bench was in my shop full time until being replaced by my first Moravian bench build a couple of years ago. Most of the other builds were based on variations of the French style or Roubo bench and for the last two years Moravian benches. There is nothing wrong with a French bench but I think the Moravian bench is a better bench for most woodworkers for several reasons, First is cost, then ease of build and finally the fact that the Moravian can be easily broken down and moved.

Wood is getting very expensive. For the same stability the Moravian bench will use less wood than a Roubo style bench. My French/English bench when built using European Beech ~three years ago cost just over $1200 USD for the wood. The current Moravian build that is approximately the same size using the same European Beech (literally out of the same stock of Beech at the wood store, I've been working the stack down for the last three years) cost less than $700 USD.

The joints used on a Roubo are not difficult for the most part but they are bigger than most woodworkers are use to making and they need to be well done to maintain stability. Other than the long stretcher mortise the joints on the Moravian bench are large but close to normal sized and the long stretcher M/T joint needs to be very loose, no precision needed. Bottom line on the build differences of the two benches, triangles are stronger than squares.

The most important difference is once a full sized Roubo is built, it is in place. Moving it to a new location is very difficult. The Moravian can be broken down to move. Even the full sized bench I'm currently building can be moved with ease. Each component, base, stretchers, and vise separates and can easily be moved by one person. The slab depending on size may need two people to move to a different location.

There is little difference in utility between the two styles of benches, it mostly depends on devices installed and how you like to work. Either bench will do the job and do it well.

Tuesday, November 27, 2018

Slab on Base

The base is finished except for clean-up. The tusk tenons are fitted and it is solid, I put the slab on to get a look-see. I'm happy with it.

Next up is blind pegging the base and slab. Once the slab is fitted I'll need to make the vise backer board, cut its tenons, drill the vise screw hole and cut a mortise for the parallel guide. Then make a vise chop and parallel guide. Chop the two mortises for the backer board in the slab and bottom long stretcher. And last make and install a tool tray.

Basically all that is left to do is fiddly work, time consuming with lots of install the slab, take the slab off, reinstall the slab and so on.


It is a heavy sucker and pretty big (see portable bench in background). Everything but the short stretchers are bigger and heavier.

I'm going to walk away from it now. Tomorrow I'll blind peg the sab and figure out what I will use for the vise backer board and maybe make it if it doesn't need a glue up. If it does, do the glue up.

ken

Monday, November 26, 2018

First Fitting of Long Stretchers to Base Units

As I promised Ralph yesterday here is a photo of the base put together:


This fitting will allow marking of the tusk tenon mortises. Then it all has to come apart to chop the mortises. While apart, I will also trim/plane the upper stretcher to match the angle of the legs and clean up the base units.

It will need putting back together to blind peg the slab and mark the slab and lower stretcher for the vise backer mortises. Back apart to chop the mortises and then back together to fit the vise backer. Anyway you get the drill, a lot of fiddling and apart/together to finish up.

I don't know if you can see the size difference between the portable bench and the shop sized one but I can tell you it's there. Taking the portable bench apart and putting together is an easy one person job. I'll bet MsBubba could do it with no help. I couldn't put this base together without MsBubba's help and you can forget about the two of us moving the slab to the base. I'll need the help of another OF or maybe young and strong the set the slab.

The legs and long stretchers are basically 16/4 European Beech, the top stretcher is 8/4 European Beech. The middle stretcher is 8/4 Sapple and the lower one is 8/4 Honey Locust. The slab is ~2180mmX460mmX90mm (~7'1"X 18"X 3 1/2") Beech. The height will be 875mm (34 1/2") and the width ~660mm (26"). I've not a clue how much it will weigh but I expect closer to 300 lbs. than 200.

If the portable bench is predictive, this sucker should be every bit as stable and solid as my hybrid Roubo/English bench and that one could hold my truck and not move. Think triangles vs. squares.

ken 

Some Things Are Too Simple

Here I am 3/4 of a Century old and I'm still getting "damn that's simple, why didn't I think of it" moments. One yesterday from C.S. at the LAP blog was just in time. I have four stretchers that need trimming flush. I have a LV flush cut saw that works but is slow and short and these four stretchers are large. It wouldn't be like trimming a few dowels flush.

C.S, to the rescue, he faced a similar problem and solved it by taking a diamond stone to the backside of a Japanese saw, making the impulse hardened saw a flush cut saw. With nothing to lose I did the same to a junk HD pull saw.

Head slap, why didn't I think of it?


Works great, fast and a clean cut. Whatever I have a new tool in my toolbox.

ken

Sunday, November 25, 2018

Second Base Is In The Clamps

The second base unit is in clamps, no photo because it looks just like the first base unit. I'll let it cure till tomorrow AM. Once the second base is out of the clamps I'll assemble the bases with the long stretchers and mark out the mortises for the tusk tenons.

Like the first base this one is a couple mm out of square but with zero wind and a small gap or two in the joints. The gaps will be easy enough to hide, my question is why. Whatever it is a workbench.

BTW, this sucker is in the short rows.

ken

Saturday, November 24, 2018

First Glue Up

The forward, #1 and #2 legs, base unit is glued up and in clamps. Tomorrow I'll fit the stretchers to the aft base unit and hopefully get it in glue up and clamps. If that happens, Monday morning I'll put that sucker together and mark off the tusk tenon mortises and start chopping 'em.

Fun stuff to go. Blind pegging the top rails and slab. Making the vise backer and installing it. Making the vise chop, parallel guide, and mounting the vise.


The base is a couple /three mm out of squire but most important is in perfect wind. The left dovetail didn't pull up completely on glue up. I'm not sure why, it fit perfectly on the dry fit and there is a small gap at the bottom of the right upper brindle joint. All of which I can live with.

Not only can I smell the barn, I have it in sight just on the horizon.

ken


That Lucky Old Sun

I've an ear bug this morning while drinking my morning coffee before heading to the shop. While that lucky old sun has nothing to do, I've a full plate.

The biggest problem at this stage is getting a whiff of the barn. It is too easy to rush and make mistakes. For myself the best answer is to forget goals and just concentrate on the job at hand. Easier said than done when a build has taken as long as this one. Even though I know the reasons for the length of time; not being able to source the base wood, a month long vacation, other projects to finish and life. It is still too long in the making and it is time to finish and move on.

I've a couple of chairs and a desk/table waiting. I even have the seat blanks for the chairs cut. It is time to move on and put the new workbench to use. Just one problem, I've got to finish it first.

ken 

Friday, November 23, 2018

Last Post Of The Day

It has been a productive shop day.  All the long stretcher tendons are fitted to their leg mortises. The two top stretchers are fitted to legs I and II and I've cut the dovetails on leg I and II's lower stretcher. Tomorrow I'll cut the dovetail socketts in legs I and II and fit the lower stretcher.

Legs III and IV will follow. It would be great if I can glue up the base units Sunday.

The front base unit:


BTW, the top stretcher is Beech, the middle Sapelle, and the bottom is Honey Locust. No reason for the different woods other than they are what was in my wood pile and are strong and heavy. This sucker will come apart to move but it ain't going to be portable.

My body is letting me know no mas, no mas. It's whisky and Ibuprofen time.

ken

More Moravian Bench

I'm back at it this AM with sawing out the tenons on the back long stretcher and fitting the base legs. So far it is going well, I made a small mistake chopping the stretcher tenons in I didn't make them long enough. Unlike most M/T joints these need to be loose and I chopped 'em a little tight in length. It is an easy fix, just take 3mm or so off the bottom of the mortise. Of the first two fitted, one needed the fix. I'll soon know about the last two.

Sawing the tenon:


Sawing the shoulder:


On to cleaning up the tenons and shoulders before testing the fit.

BTW, this is the first time I've used the Bad Axe crosscut panel saw. Nice saw. Worth the money? Good question, whatever it sure is pretty.

I want to add, the photos are out of order. I sawed the shoulders first. That way when you hit the line the waste will fall off.

ken


Thursday, November 22, 2018

Hope Everyone Had A Good T-Day

We did the full T-Day thing for just the two of us. I'll be pretty sick of Turkey by the time we finish the leftovers. I expect Sam the Wonder Dog and Sweet Maggie Dog will love it.

Making progress on the new workbench. I've cut the tenons on the long stretchers and just need to make sure the tenons fit each mortise before glueing the base units. Once the base units are glued up it is pretty much downhill from there. A bit of fiddly work but other than moving the slab from its spot leaning against the wall to the base the heavy lifting and whacking huge mortises is done.

The bench should be finished before we leave for the Winter Solstice celebration in Houston. Of course there is a big difference between should and will.

Checking the fit of the long stretcher and the leg mortise:


The top two base stretchers have been fitted. I need to cut and fit the dovetails for the lower stretcher before I can glue up the base. The fat lady isn't warming up just yet but she's in the building.

ken


Wednesday, November 14, 2018

More Mortise Chopping

Seems I have an obsession with mortise chopping. Could be because that's about the sum of my shop time lately. As I posted before there are several ways to end up with a hole in or through a piece of wood.

The main ones are: A hollow chisel mortiser, a chain mortiser, drill most of the waste and then pare the "Vs" and sides to size, and using chisels to waste the wood. Sometimes finding or having a chisel of the correct size can be a problem but if you have a chisel of the correct size and you are only doing a few mortises I think beavering away with a chisel is the fastest and best way to make a mortise.

The mortises of the last couple of days are an example. I needed a large mortise to hold the tusk tenon that makes the base of the Moravian workbench. I had a 32mm bench chisel that fit the bill for width so now it was just a matter of chopping half way down on one side, flipping the board over and chopping through on the other side. Once through the board all that remains is cleaning up the ends and fuzzies on the sides. Reasonably quick and easy.

Here is a photo of the mortise after one pass down the length with a return to the starting end to level the approximately 30mm it took to get to the 30mm depth of the first pass. Each following pass will be slightly less deep because of restricted lever room but with a total thickness of the stretcher of 130mm it doesn't take too long to get to the 60 or 70mm depth needed on each side.


I probably will not get "break through" on the next pass but I expect it will happen on the third. Then it will just be a matter of cleaning up and getting the correct angle on the ends. The floor and top of the mortise needs to be 15* to match the angle of the legs.

ken

Tuesday, November 13, 2018

Beavering Away

Why do I save the hardest for last? I guess just because I'm drawn that way.

The middle short stretchers are ready to fit. The bottom short stretchers will have a dovetail so no mortise to chop. The mortises for the long stretchers are next, these are the largest mortises of the build, 32mm wide X 130mm deep X 145mm long. Come on Ibuprofen do your thing. Here is a photo of the first one after a couple or three passes.


Maybe three more passes to be deep enough to turn the leg over and come from the back side.

Each mortise takes a little over an hour with sharpening breaks, doggie butt scratching, and resting my noodle arm so I expect with adding the day job in, the Woodcraft Boot Sale Saturday, and only one day off this week, it may be next week before the base is glued up and ready to stand on its own.

ken


Sunday, November 11, 2018

Chopping Mortises

I've four through mortises to chop. The tenon is a one shoulder tenon that is close to splitting the stretcher in half giving a 20mm wide tenon and mortise. That presents a small problem. My largest pigsticker is 1/2", I could use the 5/16" pigsticker and do two rows inside the mortise and then clean out the middle. Or drill out most of the wood and clean up the "Vs" and sides with a paring chisel. I do not like either of those options, the double mortise is too slow and too much work, The drill and pare is also slower than just going at it with a correct sized chisel.

Awhile ago I bought a set of Narex firmer chisels on a lark, mostly because it is hard to find new firmer chisels and they were cheap. The handle shape and size sucks as with most Narex chisels so after a quick sharpening I stuck them in a chisel rack and forgot about 'em until today.

As mentioned earlier I needed a 20mm chisel and guess what, the Narex set had a 20mm firmer chisel. Well they are cheap enough not to worry about ruining. I thought about using a "chisel" hammer for a couple of seconds to protect the handle but rejected that thought, again because they are cheap. Out comes my normal mortise mallet, "lumpy", and off to the races.

While I use a lump hammer as a mortise mallet I do not go all Conan on the chisel. I find light taps gives better control and is faster than whacking it hard. The lump hammer just takes less energy than other hammers.

Anyway, after a quick mortise chop I'm pretty happy with the Narex chisel and for grins I looked at the Narex web site to see what they said about the firmer chisels:

The firmer chisel is a "Special tool for rough work. Blade tapers in width and lengthwise from tip to shoulder for sidewall clearance. Forged blade is made of traditional Cr-Mn steel and heat treated to 59 HRc. Ergonomic handle from hard and hefty hornbeam wood is strong enough to withstand heavy blows with a mallet."

Hornbeam handle is good but I expect if I use the chisel again I'll take a spokeshave to it and put a couple of flats to help orientation much like a pigsticker has.

The first of four mortises is finished:


The iron held up well, after finishing the first side I looked at and felt the edge. There were no chip outs, just a couple of shiny spots. I took a couple or three strokes on the medium India and a quick strop and it was back to work.

ken

Saturday, November 10, 2018

Top Stretchers

The base is coming along, I finished fitting both top stretchers this morning. I've a need to run the streets for a couple of hours, Home Depot, Costco, pick up meds, and maybe some Vietnamese for lunch. I should finish the running around it time to start on the middle mortise and tenons this afternoon. There is a slight chance the bases will be ready for glue up Sunday. I wouldn't bet on it but maybe.


ken

Friday, November 09, 2018

Stretcher Fitted to Front Base

I've started the joinery on the bench base. First is the upper stretcher, then the middle mortise and tenon, and last the bottom dovetail. If MsBibba doesn't spot me and forgets I'm in the shop I may complete the leg joinery this weekend. I doubt it will happen but it could.

When I first started making Moravian benches I thought the three different joints on the base was an affection, maybe even showing off but after living with several benches I've come to appreciate the thought that went into and utility of the joints. I know broken record but the sum of the Moravian bench is greater than the parts.

Upper stretcher fitted to the front base:


Camera angle makes it look cattywampus. Everything is pretty square for just one stretcher fitted.

ken

Monday, November 05, 2018

Tomorrow

Please vote tomorrow if you have not already voted.

When I checked the stretcher blanks this AM one was a little off square. I'm not sure how it happened but whatever, MsBubba to the rescue. We ran it through the joiner one more time. It will be slightly smaller than the other but no big deal as each is individually fitted to its leg assembly and the stretcher mortise needs to be loose with about 6mm-10mm of vertical play.

For the most part the legs are marked out, I just have to look at them for awhile, long enough to "see", as Don Juan put it in "Don Juan a Yagui way of Knowledge", before I make the first cut.


ken

Sunday, November 04, 2018

More Bench Build

Slab is finished. Legs and stretchers are trued and dimensioned. The scut work is done. With almost every build, at this point I swear this will be my last bench. Who knows, someday it may be. Whatever, the enjoyable part of the build is next. There is still heavy stuff to move around but for the most part it is a one person job. The joinery is fun, a bench isn't furniture. it is a tool and if a joint isn't perfect as long as it is strong who cares. Same with a dent or two, after a month or so in the shop they will be joined by many others.

I'm taking a break, it is a beautiful Fall day in the desert and the Day of The Dead. I expect MsBubba and I will try to find a Mexican Cafe with a patio. If there are not too many cerveza consumed I'll start marking out tonight.

ken 

Saturday, November 03, 2018

Bench Build

The leg blanks are glued up and sized. The stretcher blanks are in the clamps. Tomorrow I'll size the stretcher blanks and maybe even start on the joinery. I'm working the backside of the clock next week so it may be slow going. There is no real hurry but I'd like to get that sucker off my plate, it has been hanging around the shop much too long.

Stretcher in glue up:


I had to enlist MsBubba to run the stretcher halfs through the jointer. Tomorrow after they come out of glue up I'll really need her help with sizing the stretchers. That's a good part of the reason I spent so much time trying to find suitable 12/4 stock.

I enjoy building benches but the parts sure get big and hard to handle in a one man shop. If anyone wants to learn to build workbenches have I got a deal for you :-).

ken

Thursday, November 01, 2018

Shop Changes

Moving the 10 lbs. around the 5 lbs. space.

I've been trying to figure out what to do with the table saw for some time, I hope to never see a full sized sheet good in the shop and I've a track saw to break it down if one ever shows face. That makes the table saw obsolete except for cross cutting and a hand saw can do most of the cross cutting. The problem is my saw is a pretty good 3 HP cabinet saw and if I sold it the return would be pennies on the dollar.

For now I refuse to give it away but it sure has taken up some valuable real estate in the shop. A couple of days ago I was trying to figure out how to run the workbench 7' stretchers through the jointer. The only way was to move the jointer. That lead to moving all the machines to new places in the shop and the table saw with rip fences removed pushed against the west wall where it can still be used to cross cut if needed but very much out of the way and taking up little space. BTW, those are the workbench leg blanks leaning on the table saw and the workbench slab against the north wall.


From left to right at the front of the shop so the outfeeds go out the door are the bandsaw, planer, and jointer.


I'll give it a go this morning as I finish dimensioning the workbench legs.


The local Woodcraft is having a parking lot boot sale on the 17th. I hope to clear more "stuff" out of the shop then. Some really good tools will be on my table. I expect to take the portable workbench and the shave horse along with a lot of good chisels, some joinery planes, a bench plane or three, a dozen or more good hand saws, marking gauges out the kazoo, and so on. It is time to clean out the dust catchers. I don't expect either the shave horse or the bench to sell but the shave horse was a prototype and one of my next projects is to build another but "prettier" one and there is not room for two shave horses in the shop.

ken

Tuesday, October 30, 2018

Stick Chair Finished

The stick chair has been moved from the shop to one of the sitting areas. I'm not sure where it's home will be, could be the kitchen table or maybe one of the bedrooms. Bottom line it is out of the shop and on to finishing the new workbench.


I've lived with MsBubba too long and have caught some of her ways. This morning after looking at the options for jointing the long stretchers I started moving machines. Just like MsBubba and the furniture I didn't really change much functionally but the machines are all in different places.  The big change is the tablesaw is against the West wall and out of the way. Photos when it is all hooked up.

ken

Monday, October 29, 2018

Saguaro

A week or so ago Jonas over at Mulesaw asked about Saguaros. This is a is a partial answer. Our house is on the edge of the Saguaro National Park so we are surrounded by Saguaros.

Here is a photo of our back garden Saguaro. A few years ago the top developed the "leans" and a year or two later it fell off and took one of the arms with it. I figured it was a goner but has recovered and is adding new arms.


Saguaros are very slow growing a 10 year old plant may be less than two inches tall yet by the time they put on arms around 100 years or so they can be 40 or more feet tall.

Saguaros define the Sonoran desert, it is the only place they grow. Basically if you see a Saguaro you are in the Sonoran Desert and if you do not you are in some other desert like the Mojave. Not totally true but close enough. They feed and shelter many of the desert critters including the two legged kind. Our saguaro has been the home of a nesting pair of Gila Woodpeckers for years.

Saguaros can live a couple of hundred years and after the die they are still useful. From the Desert Museum's web site: "After the saguaro dies its woody ribs can be used to build roofs, fences, and parts of furniture. The holes that birds nested in or "saguaro boots" can be found among the dead saguaros. Native Americans used these as water containers long before the canteen was available."

They flower in the Spring and are pollinated by birds, bees and the lesser long-nosed bat. Native Americans celebrate the start of their growing season with a drink made from Saguaro fruit.

A photo of a Saguaro skeleton MsBubba has covered in lights, I doubt you can make it out but there is also a "boot" in the middle of the shelf to the left of the skeleton.


One more photo. Looking to the West Northwest towards the Tucsons and Saguaro National Park from our back garden.


Click 'em to big 'em,

ken